Pytorch Tutorial
Quick Start
这部分可以看到整个 pytorch 的 workflow
Working with Data
pytorch 提供一些小的数据集用于训练和测试。对于计算机视觉领域的模块
TorchVision包含了一些常用数据集、模型和转换函数等等。装载数据集则使用 dataset, dataloader 类Creating Models
继承 nn.Module 类,初始化相关模块,写好向前方程
Optimizing
定义损失函数,再使用反向传播算法进行优化
Saving & Loading Models
保存模型,以及训练好的参数,方便之后测试和加载
Tensor
Tensors are similar to NumPy’s ndarrays, except that tensors can run on GPUs or other hardware accelerators. In fact, tensors and NumPy arrays can often share the same underlying memory, eliminating the need to copy data (see Bridge with NumPy). Tensors are also optimized for automatic differentiation
从以上的描述来看 Tensor 数据类型有两个特点:
- 能够在 GPU 上进行计算
- 能够自动微分
如果熟悉 Numpy 的话,学习 Tensor 将会变得更加轻松。计划分为三个部分学习 Tensor:
- 创建 Tensor
- Tensor 的属性
- Tensor 内置方法
创建 Tensor
参考 Cheat Sheet
import torch
import numpy as np

x = torch.randn(*size)              # tensor with independent N(0,1) entries
x = torch.[ones|zeros](*size)       # tensor with all 1's [or 0's]
x = torch.tensor(L)                 # create tensor from [nested] list or ndarray L
y = x.clone()                       # clone of x
with torch.no_grad():               # code wrap that stops autograd from tracking tensor history
requires_grad=True                  # arg, when set to True, tracks computation
                                    # history for future derivative calculations

# create from other tensor
y = torch.ones_like(x)
y = torch.zeros_like(x)
y = x.new_zeros(*shape)
创建 tensor 和创建 ndarray 是相似的。既可以生成指定分布的 tensor,也可以从 ndarray 中创建。由于 tensor 和 ndarray 关系密切,它们之间的转换也是很方便的。同时 tensor 和 numpy 也是共用内存的
# tensor 转化为 ndarray
x = torch.ones(2, 2)
n = x.numpy()
n[0, 0] = -1	# 该操作会改变 x

# ndarray 转化为 tensor
n = np.arange(12)
x = torch.from_numpy(n)
Tensor 的属性
主要用3个属性:shape, dtype, deviece
tensor = torch.rand(3,4)

# f"string" 代表格式化,类似 str.format()
print(f"Shape of tensor: {tensor.shape}")
print(f"Datatype of tensor: {tensor.dtype}")
print(f"Device tensor is stored on: {tensor.device}")
进一步还有与梯度相关的属性 grad, requires_grad, data
Tensor 内置方法
Over 100 tensor operations, including arithmetic, linear algebra, matrix manipulation (transposing, indexing, slicing), sampling and more are comprehensively described here.
还是分模块来接招这些内置方法
Standard numpy-like indexing and slicing
tensor 的索引和 ndarray 的索引是相同的,包括多元索引、布尔索引、花式索引,参考整理的 numpy cheat sheet
Move tensors to GPU
# We move our tensor to the GPU if available
if torch.cuda.is_available():
    tensor = tensor.to('cuda')
Dimensionality
x.size()                                  # return tuple-like object of dimensions
x = torch.cat(tensor_seq, dim=0)          # concatenates tensors along dim
x = torch.stack(tensor_seq, dim=0)		  # stack tensors of the same shape along dim
y = x.view(a,b,...)                       # reshapes x into size (a,b,...)
y = x.view(-1,a)                          # reshapes x into size (b,a) for some b
y = x.transpose(a,b)                      # swaps dimensions a and b
y = x.permute(*dims)                      # permutes dimensions
y = x.unsqueeze(dim)                      # tensor with added axis
y = x.unsqueeze(dim=2)                    # (a,b,c) tensor -> (a,b,1,c) tensor
y = x.squeeze()                           # removes all dimensions of size 1 (a,1,b,1) -> (a,b)
y = x.squeeze(dim=1)                      # removes specified dimension of size 1 (a,1,b,1) -> (a,b,1)
-----------------------------
y = x.repeat(*sizes)
y = x.repeat_interleave([tensor|int], dim)# similar to numpy.repeat()
Algebra
ret = A.mm(B)       # matrix multiplication
ret = A.mv(x)       # matrix-vector multiplication
ret = y.dot(x)      # Computes the dot product of two 1D tensors
x = x.t()           # matrix transpose

# This computes the element-wise product
z1 = tensor_1 * tensor_2

# convert one element tensor to a Python numerical value
x.item()
GPU Usage
torch.cuda.is_available		# check for cuda
torch.version.cuda			# check version
torch.__version__			# check torch version
x = x.cuda()				# move x's data from CPU to GPU and return new object
x = x.cpu()					# move x's data from GPU to CPU and return new object

if not args.disable_cuda and torch.cuda.is_available():     # device agnostic code and modularity
    args.device = torch.device('cuda', index)
else:
    args.device = torch.device('cpu')

net.to(device)				# recursively convert their parameters and buffers to device specific tensors
x = x.to(device)			# copy your tensors to a device (gpu, cpu)
Datasets & DataLoader
Code for processing data samples can get messy and hard to maintain; we ideally want our dataset code to be decoupled from our model training code for better readability and modularity. PyTorch provides two data primitives:
torch.utils.data.DataLoaderandtorch.utils.data.Datasetthat allow you to use pre-loaded datasets as well as your own data.
Dataset 类存储了数据集的路径,并且定义了 __getitem__ 方法来获取单个数据集及其对应标签。而 DataLoder 则将数据集打包形成一个可迭代对象,方便不同方式的遍历
载入 torchvision 中的数据集
先介绍如何从 torchvision 中载入官方数据集 Fashion-MNIST
from torchvision import datasets
from torchvision.transforms import ToTensor

training_data = datasets.FashionMNIST(
    root="data",
    train=True,
    download=True,
    transform=ToTensor()
)

test_data = datasets.FashionMNIST(
    root="data",
    train=False,
    download=True,
    transform=ToTensor()
)
参数的说明如下:
rootis the path where the train/test data is stored,trainspecifies training or test dataset,download=Truedownloads the data from the internet if it’s not available atroot.transformandtarget_transformspecify the feature and label transformations
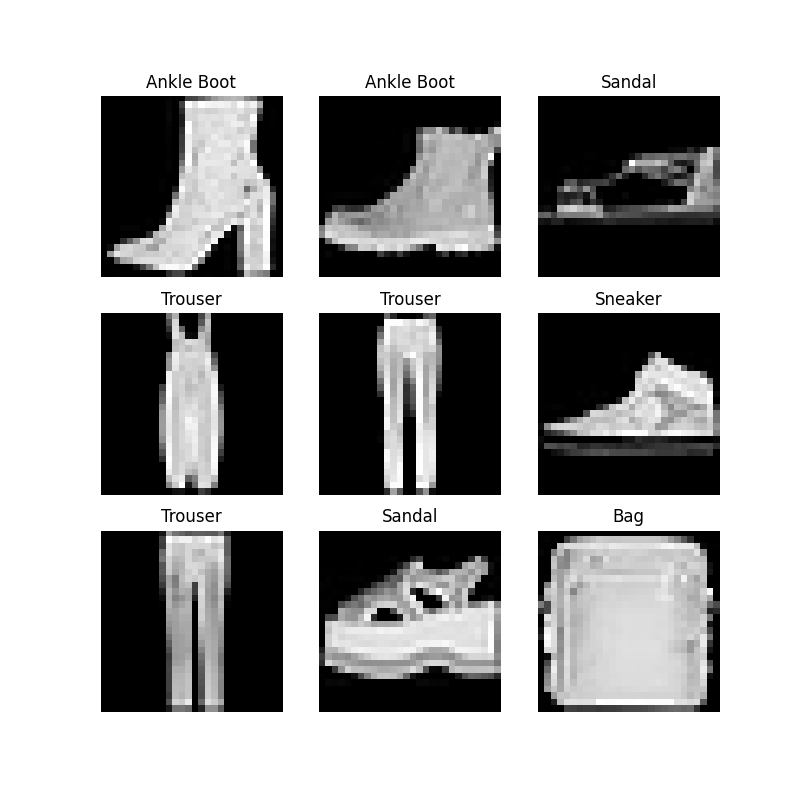
用 matplotlib 来展示数据集中的部分图像,看能不能正常工作
import matplotlib.pyplot as plt

labels_map = {
    0: "T-Shirt",
    1: "Trouser",
    2: "Pullover",
    3: "Dress",
    4: "Coat",
    5: "Sandal",
    6: "Shirt",
    7: "Sneaker",
    8: "Bag",
    9: "Ankle Boot",
}
figure = plt.figure(figsize=(8, 8))
cols, rows = 3, 3
for i in range(1, cols * rows + 1):
    sample_idx = torch.randint(len(training_data), size=(1,)).item()
    img, label = training_data[sample_idx]
    figure.add_subplot(rows, cols, i)
    plt.title(labels_map[label])
    plt.axis("off")
    plt.imshow(img.squeeze(), cmap="gray")
plt.show()
结果形如下面的图片
载入自定义数据集
A custom Dataset class must implement three functions:
__init__,__len__, and__getitem__.
__init__初始化包含图像、注释文件的目录,以及对数据集的 transform
__len__返回数据集样本个数
__getitem__该函数返回数据集中索引为 idx 的样本及其对应标签
下面通过一段代码来具体看看这些函数的实现
import os
import pandas as pd
from torchvision.io import read_image

class CustomImageDataset(Dataset):
    def __init__(self, annotations_file, img_dir, transform=None, target_transform=None):
        self.img_labels = pd.read_csv(annotations_file)
        self.img_dir = img_dir
        self.transform = transform
        self.target_transform = target_transform

    def __len__(self):
        return len(self.img_labels)

    def __getitem__(self, idx):
        img_path = os.path.join(self.img_dir, self.img_labels.iloc[idx, 0])
        image = read_image(img_path)
        label = self.img_labels.iloc[idx, 1]
        if self.transform:
            image = self.transform(image)
        if self.target_transform:
            label = self.target_transform(label)
        return image, label
可以看出主要思路就是继承原 Dataset 类,然后改写了上面提到的三个方法,这也体现了面向对象的多态性
Transforms
We use transforms to perform some manipulation of the data and make it suitable for training. The torchvision.transforms module offers several commonly-used transforms out of the box.
数据增强是提升表现的常用手段,可以通过对数据集进行 transform 完成。文档举了两个非常简单的 transform 例子,更多的应用还是需要结合具体论文具体实践:
- ToTensor converts a PIL image or NumPy
ndarrayinto aFloatTensor. and scales the image’s pixel intensity values in the range [0., 1.] - Lambda transforms apply any user-defined lambda function. Here, we define a function to turn the integer into a one-hot encoded tensor.
import torch
from torchvision import datasets
from torchvision.transforms import ToTensor, Lambda

ds = datasets.FashionMNIST(
    root="data",
    train=True,
    download=True,
    transform=ToTensor(),
    target_transform=Lambda(lambda y: torch.zeros(10, dtype=torch.float).scatter_(0, torch.tensor(y), value=1))
)
使用 DataLoader 进行迭代
将 dataset 传入 DataLoader 当中,形成可迭代对象
from torch.utils.data import DataLoader

train_dataloader = DataLoader(training_data, batch_size=64, shuffle=True)
如果需要更复杂的取样,则需要 Samplers,下面举一个 sampler 的子类进行说明
from torch.utils.data.sampler import SubsetRandomSampler

NUM_TRAIN = 5000
sampler = SubsetRandomSampler(range(NUM_TRAIN))
# 仅采样前 5000 个样本作为训练集
train_dataloader = DataLoader(training_data, batch_size=64, sampler=sampler)
在创建好 dataloader 实例过后,由于其是迭代器对象,以通过循环进行迭代。迭代器返回对象为一个元组,元组成员为数据集列表和其对应的标签列表。下面用 next & iter 查看迭代器返回的第一个对象
train_features, train_labels = next(iter(train_dataloader))
print(f"Feature batch shape: {train_features.size()}")
print(f"Labels batch shape: {train_labels.size()}")
img = train_features[0].squeeze()
label = train_labels[0]
plt.imshow(img, cmap="gray")
plt.show()
print(f"Label: {label}")

# Output
# Feature batch shape: torch.Size([64, 1, 28, 28])
# Labels batch shape: torch.Size([64])
# Label: 9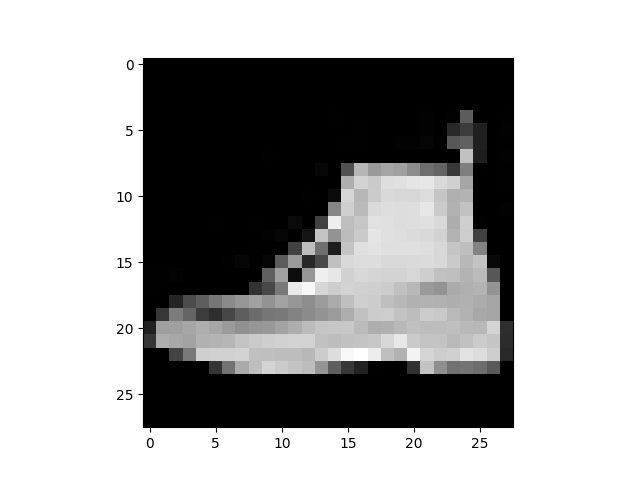
Build Models
Neural networks comprise of layers/modules that perform operations on data. The torch.nn namespace provides all the building blocks you need to build your own neural network.
Every module in PyTorch subclasses the nn.Module. A neural network is a module itself that consists of other modules (layers). This nested structure allows for building and managing complex architectures easily.
建造网络模型的逻辑主要为:
- 继承
nn.Module类,这是所有网络的基类。让自定义的模型能够使用基类的方法,便于管理模型框架,例如:执行向前路径、管理模型参数及梯度、打印模型模块、模型嵌套等等 - 重写
__init__方法,在方法中定义需要的模块 - 重写
forward方法,在方法中定义向前计算的路径
下面举一个简单的神经网络为例,看看具体实现
import torch
from torch import nn

device = 'cuda' if torch.cuda.is_available() else 'cpu'
print('Using {} device'.format(device))

# 定义网络模型
class NeuralNetwork(nn.Module):
    def __init__(self):
        super().__init__()
        self.flatten = nn.Flatten()
        self.linear_relu_stack = nn.Sequential(
            nn.Linear(28*28, 512),
            nn.ReLU(),
            nn.Linear(512, 512),
            nn.ReLU(),
            nn.Linear(512, 10),
        )

    def forward(self, x):
        x = self.flatten(x)
        x = self.flatten(x)
        print(x.shape)
        logits = self.linear_relu_stack(x)
        return logits


# 将模型放到 GPU 上
model = NeuralNetwork().to(device)

# 打印模型模块
print("Model structure: ", model, "\n\n")
for name, param in model.named_parameters():
    print(f"Layer: {name} | Size: {param.size()} | Values : {param[:2]} \n")

# 简单测试
X = torch.randn(3, 1, 28, 28, device=device)
logits = model(X)
print(f'logits: {logits.shape}')
pred_probab = nn.Softmax(dim=1)(logits)
y_pred = pred_probab.argmax(1)
print(f"Predicted class: {y_pred}")其中一些模块的功能就不再这里里描述了,例如:nn.Sequential, nn.Flatten,请直接参考 文档
Automatic Differentiation
To compute those gradients, PyTorch has a built-in differentiation engine called
torch.autograd. It supports automatic computation of gradient for any computational graph.
实际上在自己写代码时,并没有显式地调用 torch.autograd,这个模块更多地是做背后功臣。在了解自动微分之前,需要了解如何使用反向传播算法来系统地计算参数的梯度。反向传播算法的核心就在于:通过计算图和向前计算时存储的中间结果,从 root (根节点) 计算到 leaf (叶节点),反向逐层得到各个节点的梯度。了解反向传播算法,官方文档也推荐了 3Blue1Brown 视频,3b1b nb!
自动微分
下面举一个例子来实现简单的自动微分
import torch

# 使用随机种子
torch.manual_seed(1998)

x = torch.ones(5)  # input tensor
y = torch.zeros(3)  # expected output
w = torch.randn(5, 3, requires_grad=True)
b = torch.randn(3, requires_grad=True)
z = torch.matmul(x, w)+b
loss = torch.nn.functional.binary_cross_entropy_with_logits(z, y)
以上构建了一个简单的计算流程,将需要计算的梯度的参数设为 requires_grad=True,或者用 x.requires_grad_(True),说明一下:方法名后缀带下划线 _ 则代表该方法为 in place 方法,会直接修改变量
用公式来表示以上的计算过程
用计算图表示以上的计算过程
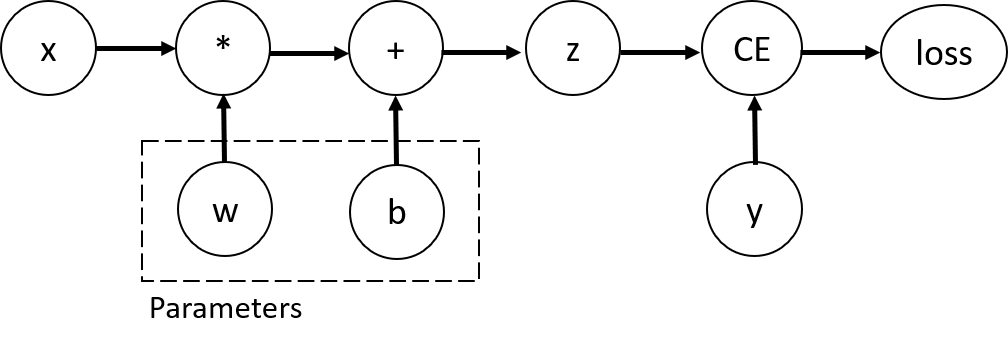
可以看到 tensor 在计算过程中在不断生成计算图
print(x)
# tensor([1., 1., 1., 1., 1.])
print(z)
# tensor([-2.9086,  0.8690,  1.4758], grad_fn=<AddBackward0>)
因为 z 是计算得到的 tensor,可以看到其中还包含一个 grad_fn,这是 pytorch 中 Function 类的一个对象,可以把其看作计算图的具体实现。接下来只需要一行代码,就可以计算计算图中所有需要的梯度
loss.backward()

print(b.grad)
# tensor([0.0172, 0.2348, 0.2713])
注意事项:
每个计算图只能计算一次,之后所有的中间结果将会被清除,但可以使用
loss.backward(retain_graph=True)保留中间结果,举个简单例子说明(以下例子均沿用之前自动微分例子中的变量)# 第一次 loss 反向传播计算梯度 loss.backward() # 基于 loss 创建一个新的 loss_2 loss_2 = loss ** 2 loss_2.backward() # 在第二次反向传播计算中,显然会重新进行第一次的反向传播的计算流程 # RuntimeError: Trying to backward through the graph a second time, but the buffers have already been freed. Specify retain_graph=True when calling backward the first time.一般只对标量进行
backward操作。对矢量进行backward操作,即对矢量进行求导,会得到雅可比矩阵# w.shape=(5, 3) w.requires_grad=True z = w ** 2 z.backward() # RuntimeError: grad can be implicitly created only for scalar outputs对于中间变量(即非叶节点变量),由于在反向传播时需要计算其梯度,在自动微分时会标记其
requires_grad=True,但一般在反向传播计算完成之后,不保留这些中间结果的梯度,如需要则要调用方法x.retain_grad()# z.retain_grad() loss.backward() print(z.grad) # warnings.warn("The .grad attribute of a Tensor that is not a leaf Tensor is being accessed. Its .grad "
禁用自动微分
禁用自动微分主要应用在两个场景:
- Freeze parameters,将参数从计算图中剔除,gradient flow 不会经过该参数
- 仅计算向前路径,不跟踪所有梯度,加快计算
针对以上的场景,有两种方法能够禁用自动微分:
x.detach_():将 x 变量requires_grad=Falsewith torch.no_grad():在该模块内的所有运算,都不会跟踪计算图,即所有变量requires_grad=False
下面仅对 detach 方法进行重点说明
# detach
import torch

mode = ['no_detach', 'detach']
for mode_ in mode:
    print(f'MODE: {mode_}')
    x = torch.ones(10, requires_grad=True)
    y = x ** 2
    z = x ** 3
    if mode_ == 'detach':
        z.detach_()
    loss = (y+z).sum()
    print(f'parameter z:\n{z}')
    loss.backward()
    print(f'x_grad:\n{x.grad}','\n')

''' result
MODE: no_detach
parameter z:
tensor([1., 1., 1., 1., 1., 1., 1., 1., 1., 1.], grad_fn=<PowBackward0>)
x_grad:
tensor([5., 5., 5., 5., 5., 5., 5., 5., 5., 5.])

MODE: detach
parameter z:
tensor([1., 1., 1., 1., 1., 1., 1., 1., 1., 1.])
x_grad:
tensor([2., 2., 2., 2., 2., 2., 2., 2., 2., 2.])
'''
可以看到将 b 节点从计算图中剔除之后,x 的梯度减少了,因为 gradient flow 不从 b 节点流过,前后计算图如下
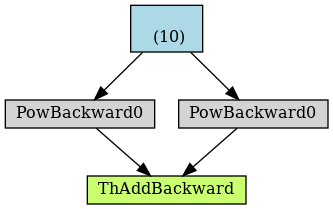
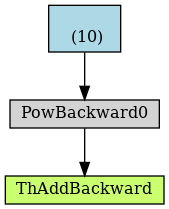
值得注意的是在计算图建立之后,对变量进行 detach 并不会影响反向传播
import torch

x = torch.ones(10, requires_grad=True)
y = x ** 2
z = x ** 3
loss = (y+z).sum()

print(f'parameter z:\n{z}')
# tensor([1., 1., 1., 1., 1., 1., 1., 1., 1., 1.], grad_fn=<PowBackward0>)

z.detach_()
print(f'parameter z_detached:\n{z}')
#tensor([1., 1., 1., 1., 1., 1., 1., 1., 1., 1.])

loss.backward()
print(f'x_grad:\n{x.grad}','\n')
# tensor([5., 5., 5., 5., 5., 5., 5., 5., 5., 5.])
这是为什么呢?我的理解是计算图在构建完成之后,仅进行 detach 不会对已经生成的计算图进行修改,且 tensor 本身的值没有发生改,计算图就可以使用该值进行梯度计算。而之前的 for 循环每一次循环都重新创建了计算图
Optimization
这里将是整个深度学习耗时最长的部分,需要将之前的数据集送入到模型之中,使用优化算法改进模型。这一部分沿用之前的 Fashion-MNIST 数据集和神经网络,完整代码参考 prerequisite code
优化循环
在整个循环过程中,除了之前提到的数据集和模型,还有两个重要元素:损失函数和优化器。Pytorch 中的损失函数在 nn 模块下,优化器在 optim 模块下
import torch.nn as nn
import torch.optim as optim

loss_fn = nn.X()                            # where X is L1Loss, MSELoss, CrossEntropyLoss...
opt = optim.X(model.parameters(), ...)      # where X is SGD, Adadelta, Adagrad, Adam...
整体的优化逻辑分为两步,首先使用反向传播算法计算出参数的梯度,然后根据这些梯度采用不同的优化算法进行迭代优化 opt.step() 。下面的代码实现了 train_loop 和 test_loop 分别实现训练和测试模型
def train_loop(dataloader, model, loss_fn, optimizer):
    size = len(dataloader.dataset)
    for batch, (X, y) in enumerate(dataloader):
        # Compute prediction and loss
        pred = model(X)
        loss = loss_fn(pred, y)

        # Backpropagation
        optimizer.zero_grad()
        loss.backward()
        optimizer.step()

        if batch % 100 == 0:
            loss, current = loss.item(), batch * len(X)
            print(f"loss: {loss:>7f}  [{current:>5d}/{size:>5d}]")


def test_loop(dataloader, model, loss_fn):
    size = len(dataloader.dataset)
    num_batches = len(dataloader)
    test_loss, correct = 0, 0

    # Will not build computational graph
    with torch.no_grad():
        for X, y in dataloader:
            pred = model(X)
            test_loss += loss_fn(pred, y).item()
            correct += (pred.argmax(1) == y).type(torch.float).sum().item()

    test_loss /= num_batches
    correct /= size
    print(f"Test Error: \n Accuracy: {(100*correct):>0.1f}%, Avg loss: {test_loss:>8f} \n")

model = NeuralNetwork()
loss_fn = nn.CrossEntropyLoss()
learning_rate = 1e-3
optimizer = torch.optim.SGD(model.parameters(), lr=learning_rate)

epochs = 10
for t in range(epochs):
    print(f"Epoch {t+1}\n-------------------------------")
    train_loop(train_dataloader, model, loss_fn, optimizer)
    test_loop(test_dataloader, model, loss_fn)
print("Done!")
最终结果也请直接查看 optimization loop
Save and Load the Model
保存模型参数
模型的参数存储在其内部的一个字典当中,使用 model.state_dict() 方法可以返回该字典。使用 torch.save 方法即可存储
import torch
import torchvision.models as models

model = models.vgg16(pretrained=True)
torch.save(model.state_dict(), 'model_weights.pth')
这样就将模型参数保存到当前文件夹下,如果需要加载模型参数,则必须要先创建一个模型实例
model = models.vgg16() # we do not specify pretrained=True, i.e. do not load default weights
model.load_state_dict(torch.load('model_weights.pth'))
model.eval()注意:一定要在推理之前调用 model.eval() 方法,以将 dropout 和 batch_norm 层设置为评估模式。不这样做会产生不一致的推理结果
保存模型参数及其结构
如果想要同时保存其结构,则直接传入模型本身
torch.save(model, 'model.pth')加载模型虽然不需要先实例化模型,但仍需要有模型的定义
# Model class must be defined somewhere
model = torch.load('model.pth')
模型导出为 ONNX
ONNX is an open format built to represent machine learning models. ONNX defines a common set of operators - the building blocks of machine learning and deep learning models - and a common file format to enable AI developers to use models with a variety of frameworks, tools, runtimes, and compilers.
Pytorch 支持将模型转为 ONNX 格式,更多信息就不打算整理了 Exporting Model to ONNX ONNX tutorial
整体复习
Congratulations! You have completed the PyTorch beginner tutorial! Try revisting the first page to see the tutorial in its entirety again. We hope this tutorial has helped you get started with deep learning on PyTorch. Good luck!
补充
根据自己在实践中遇到的 torch 常用操作总结,torch 里面习惯使用 dim= 而不是 axis=
import torch

torch.eye(n, m=None)	# n rows, m col
torch.nonzero(input)	# return a 2D tensor (N, input.shape)
torch.where(condition, x, y)
torch.clamp(input, min=None, max=None)
torch.max(input, sum)	# return a tuple (tensor, LongTensor)
torch.norm(input, dim=None)

# x is a tensor
x.repeat(*sizes)	# repeat times
x.expand(*sizes)	# expand to sizes
x.contigous()		# 连续空间
x.repeat_interleave(tensor)	# numpy.repeat()

import torch.nn.functional as F
F.interpolate(input, size, mode=)
F.one_hot(LongTensor, num_classes=-1)

